Learning how to tie a tie is a necessary skill for any professional wardrobe. You only need a few simple steps to master the basics. This guide will walk you through every popular method clearly and easily. For tips on keeping your ties and dress shirts spotless, see our guide on how to remove stains from clothes.
The “Before You Start” Checklist
Before standing in front of your mirror, gather these essential items:
- A clean, unwrinkled necktie.
- A button-down dress shirt that fits your neck properly.
- A well-lit mirror.
- A collar stay (optional but recommended for structure).
- Clean hands to avoid transferring oils onto delicate silk.
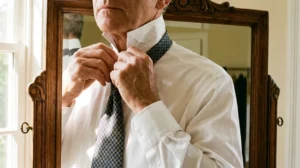
The Root Cause: Why Tie Knots Look Sloppy
A sloppy tie knot happens when the fabric tension is completely uneven. Incorrect collar matching and improper lengths also cause uneven, loose knots. You must pair the right knot with the correct shirt collar.
Understanding collar types is the first step to looking sharp. A wide collar requires a wide knot. A narrow collar requires a narrow knot. If you force a large knot into a small collar, the fabric will bunch up awkwardly. This ruins the crisp appearance of your outfit.
The weight of the fabric also plays a huge role. Heavy wool fabrics require simpler knots. Delicate silks can handle complex, layered wraps. Taking a moment to match these elements prevents frustration. It ensures your neckline looks tailored and highly professional. For proper care of delicate silks, refer to our dry cleaning process guide.
The Four-in-Hand Knot (Mild/Casual Severity)
The Four-in-Hand is the easiest and fastest way to tie a tie. It creates a slightly asymmetrical, narrow shape perfect for casual business environments.
This method works beautifully with narrow collars and button-down shirts. It is the absolute best choice for beginners. You can master this technique in less than two minutes.
Step-by-Step Instructions
- Stand in front of a mirror with your shirt collar flipped up.
- Drape the fabric around your neck.
- Place the wide end on your right side.
- Place the narrow end on your left side.
- Adjust the wide end so it hangs exactly 12 inches (30 cm) lower than the narrow end.
- Cross the wide end directly over the narrow end.
- Wrap the wide end tightly under the narrow end.
- Bring the wide end across the front again to form a loop.
- Pull the wide end up through the neck loop near your chin.
- Slide the wide end firmly down through the front loop you just created.
- Hold the narrow end securely with one hand.
- Slide the finished knot upward toward your collar.
- Fold your shirt collar down and adjust the final alignment.
The Half-Windsor Knot (Moderate/Professional Severity)
The Half-Windsor creates a medium-sized, symmetrical triangle shape. It is the most versatile option for daily office wear and standard job interviews.
Use this style when wearing medium spread collars. It provides a highly polished look without feeling overly stuffy. It uses less fabric than the Full Windsor, making it ideal for standard lengths.
Step-by-Step Instructions
- Drape the necktie over your shoulders with the wide part on the right.
- Drop the wide part 12 inches (30 cm) below the narrow part.
- Cross the wide part horizontally over the narrow part.
- Loop the wide part underneath the narrow part.
- Pull the wide part upward and push it down through the neck opening.
- Bring the wide part across the front of the knot from right to left.
- Pull the wide part back up through the neck opening again.
- Push the wide part down through the front loop.
- Pinch the base to create a subtle dimple.
- Pull the narrow tail to slide the knot up to your chin.
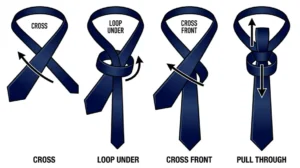
The Full Windsor Knot (Severe/Formal Severity)
The Full Windsor is a large, thick, and perfectly symmetrical knot. It projects power and is the best choice for weddings, major presentations, and formal events.
You must wear this style with a wide spread collar or cutaway collar. It requires a lot of fabric. If you are very tall, you might need an extra-long neckwear piece for this method.
Step-by-Step Instructions
- Drape the fabric around your neck with the wide side on your right.
- Drop the wide side roughly 14 inches (35 cm) below the narrow side.
- Cross the wide side over the narrow side.
- Pull the wide side up through the neck opening from underneath.
- Bring the wide side down to the right.
- Wrap the wide side under the narrow side to the left.
- Pull the wide side up and down through the neck opening again.
- Cross the wide side over the front of the knot to create a band.
- Bring the wide side up through the neck opening one final time.
- Slide the wide side down through the front loop.
- Gently squeeze the sides of the knot to tighten it evenly.
- Pull the narrow tail to raise the knot securely into place.
The Self-Tie Bow Tie (Special Occasions)
A self-tie bow tie offers unmatched elegance for tuxedo events and black-tie galas. Tying it feels exactly like tying your shoelaces, just performed around your neck.
Many men fear this style, but the technique is completely logical. It takes a few practice rounds to master. Always choose a self-tie over a pre-tied clip for true formal settings.
Step-by-Step Instructions
- Flip your collar up and place the fabric around your neck.
- Adjust the right side to be two inches (5 cm) longer than the left side.
- Cross the longer end over the shorter end.
- Pull the longer end up through the neck loop and let it rest on your shoulder.
- Fold the shorter end horizontally to form a basic bow shape.
- Pinch this bow shape closely against your neck.
- Bring the resting longer end straight down over the center of the bow.
- Pinch the sides of the bow forward.
- Find the small loop created behind the bow.
- Fold the longer end and push it through that exact back loop.
- Pull the folded edges on both sides simultaneously to tighten.
- Adjust the fabric until the wings look completely symmetrical.
Fabric Specifics: Silk vs. Knit vs. Wool
The thickness and texture of your fabric drastically alter the tying method. You must adapt your technique based on the specific material you are wearing.
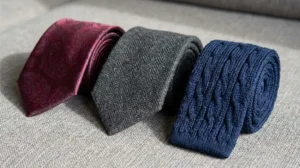
Smooth silk slips easily and holds tight, crisp shapes. Thick wool creates enormous bulk very quickly. Knitted textures grip themselves tightly and resist sliding around your collar.
Smooth Silk
Silk is the traditional gold standard. It slides beautifully and handles complex wraps with ease. You can comfortably use the Full Windsor or Eldredge knot with standard silk. Always use clean hands. Silk stains quickly from natural skin oils.
Knitted Cotton
Knitted materials are heavily textured and visually thick. They are highly casual. Never use a Full Windsor on a knitted piece. The bulk will choke your collar. Always use the simple Four-in-Hand method for knitted textures.
Heavy Wool or Tweed
Wool blends are popular in the winter months. Like knits, wool creates massive volume immediately. Stick to the Half-Windsor or Four-in-Hand. Pulling wool too tightly will damage the internal lining of the fabric.
Knot Comparison Guide
This table helps you quickly select the best option based on your daily needs.
| Knot Style | Difficulty Level | Symmetry | Best Collar Match | Best Occasion |
|---|---|---|---|---|
| Four-in-Hand | Beginner | Asymmetrical | Narrow Point | Daily Casual |
| Half-Windsor | Intermediate | Symmetrical | Medium Spread | Office Work |
| Full Windsor | Advanced | Symmetrical | Wide Spread | Weddings |
| Bow Tie | Advanced | Symmetrical | Wing Collar | Black Tie |
Common Mistakes: What NOT to Do
Wearing your neckwear incorrectly completely ruins your professional image. Avoiding these basic errors instantly elevates your personal style.
The most frequent error is ignoring proper length proportions. The tip of your fabric must barely touch the center of your belt buckle. If it hangs below the belt, it looks incredibly sloppy. If it rests above your stomach, you will look comical.
Another major mistake is wearing an extremely loose knot. The fabric must sit completely flush against the top button of your shirt. A sagging neckline signals laziness. Always ensure the narrow tail is properly hidden inside the keeper loop on the back.
Do not use harsh chemical spot cleaners on silk stains. Strong solutions will permanently strip the color from delicate fabrics. Use gentle steam and professional dry cleaning instead.
Long-Term Prevention Guide: Care and Storage
Improper storage destroys expensive fabrics very quickly. A solid maintenance routine prevents permanent wrinkles and internal lining damage.
Never pull the narrow tail through a tightened knot to remove it. This rips the delicate internal stitching. Always reverse the exact tying steps gently. Loosen the front loop first, then pull the fabric free smoothly without harsh yanking.
For daily storage, roll knitted and wool fabrics loosely and place them in a drawer. This prevents heavy fabrics from stretching out. For silk, hang them smoothly over a dedicated wooden hanger. Gravity will naturally pull out daily wrinkles overnight.
If you travel frequently, invest in a padded travel cylinder. This stops luggage compression from creating sharp, permanent creases in your formalwear.
Key Takeaways
- Always match your knot size directly to your shirt collar width.
- The Four-in-Hand is the fastest and easiest method for daily wear.
- The tip of your fabric must always touch the center of your belt buckle.
- Never pull the fabric aggressively to remove it at the end of the day.
- Store silk flat on a hanger and keep knitted fabrics loosely rolled in a drawer.
Before you start
Tick these off as you gather them — nothing here is specialised.
0 of 5 ready · Ticks are for this visit only and aren't saved.
Common questions
How do you tie a tie for beginners?
The Four-in-Hand is the best method for absolute beginners. Cross the wide side over the narrow side, wrap it underneath, bring it across the front again, push it up through the neck opening, and slide it down the front loop.
What is the easiest tie knot to learn?
The Oriental knot, also known as the Simple knot, is technically the easiest. However, the Four-in-Hand remains the most practical and popular easy method worldwide. It requires only three basic wraps and tightens very smoothly.
How long should a tie hang?
The diamond tip of the wide end must gently touch the absolute center of your belt buckle. It should never hang below the belt line. It should never rest high up on your stomach.
What is the difference between a Half-Windsor and Full Windsor?
The Full Windsor requires a complete double wrap around the collar loop. This creates a massive, perfectly symmetrical triangle. The Half-Windsor skips one of these loops. It produces a smaller, lighter triangle suited for standard collars.
How do you make a dimple in a tie?
You create a dimple during the very last tightening step. Pinch the edges of the wide fabric slightly inward directly below the knot. Pull the fabric down smoothly while holding that pinch. The fabric will naturally fold inward.
Which tie knot is best for an interview?
The Half-Windsor is highly recommended for job interviews. It is completely professional, neat, and symmetrical. It avoids looking arrogant or overly flashy. Pair it with a solid blue or subtle striped pattern for excellent results.
Can you wear a thick knot with a narrow collar?
You should never wear a thick style with a narrow collar. The bulky fabric will physically lift the collar points off your chest. This looks completely disproportionate. Always match thick styles with wide spread collars.
How do you properly untie a tie?
You must properly reverse the tying process to remove it safely. Loosen the front loop completely. Slide the wide end out backward. Never yank the narrow tail aggressively. Yanking ruins the internal lining and permanently twists the shape.
Are skinny neckties tied differently than wide neckties?
Skinny styles look terrible with massive wraps. You must use a small, compact method like the Four-in-Hand. A Full Windsor on a skinny width will consume all the fabric and look awkward. Keep the knot small.
How do you wash or clean a silk tie?
You must never put silk in a washing machine. Do not use strong spot treatments. Simply blot spills immediately with a dry cloth. Take the item to a professional dry cleaner to safely eradicate deep stains without ruining the color.
Was this article useful?