Learning how to change a tire is an essential driving skill that saves you time, money, and stress. A sudden roadside puncture can happen during a morning commute, a late-night drive, or a weekend road trip. Waiting hours for a tow truck in bad weather is frustrating when you already own the necessary tools. This guide walks you through how to change a tire safely on any passenger car, SUV, or pickup truck. You will learn exact lifting points, star tightening patterns, and proper inflation checks for global vehicles.
Key Takeaways
- Always park on a flat, solid surface away from moving traffic before inspecting a damaged wheel.
- Engage the parking brake and place wheel chocks diagonally opposite the flat wheel to stop rolling.
- Loosen the lug nuts by a half turn while the vehicle weight still rests on the ground.
- Lift the car only at reinforced factory jacking points until the tire clears the pavement by 6 inches (15 cm).
- Tighten wheel fasteners in a crisscross star pattern to seat the wheel flush against the brake rotor.
- Inflate compact temporary spares to 60 PSI (4.1 bar) and keep speeds below 50 mph (80 km/h).
The “Before You Start” Checklist
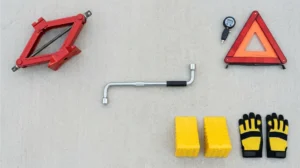
Gather these essential items from your trunk or boot before you begin working on the vehicle:
- Properly inflated spare wheel: Either a full-size match or a compact space-saver donut tire.
- Vehicle jack: A factory scissor jack, bottle jack, or garage hydraulic floor jack.
- Lug wrench or wheel brace: Sized correctly for your vehicle lug nuts or wheel bolts.
- Locking wheel nut key: Required if your alloy wheels use anti-theft security lugs.
- Wheel chocks: Two purpose-built rubber wedges, wooden blocks, or large flat bricks.
- Vehicle owner’s manual: Needed to verify exact frame lifting points and torque specifications.
- Calibrated torque wrench: Highly recommended for precise final tightening at home.
- Portable tire inflator and digital tire pressure gauge: Essential for verifying air pressure before driving.
- Safety gear: High-visibility reflective vest, warning triangle, work gloves, and a bright flashlight.
- Cleaning supplies: A wire brush, microfiber cloth, and penetrating lubricant for rusty wheel studs.
What Causes a Flat Tire and Why Proper Wheel Mounting Matters?
A flat tire occurs when sharp road debris, valve stem wear, or impact damage allows pressurized air to escape. Driving on a deflated wheel crushes the rubber sidewall between the metal rim and the asphalt. Proper wheel mounting restores safe ground clearance and ensures even clamping force across the brake hub assembly.
Understanding the mechanical science behind a flat wheel helps you avoid expensive suspension and brake damage. Modern tubeless tires rely on an airtight seal between the rubber bead and the metal wheel rim. When a screw or nail pierces the tread, internal air pressure drops below safe operating levels. If you continue rolling on a low tire, friction heats the rubber structure past 200°F (93°C). That extreme heat breaks down the internal polymer bonds and causes the sidewall to shred apart.
Before you lift the car, inspect the rubber to see if you can can a flat tire be repaired without removing the wheel. Small punctures in the central tread area can sometimes hold air temporarily if you use a portable tire inflator. However, any puncture larger than 0.25 inches (6 mm) or any damage on the sidewall requires immediate spare installation.
Proper fastener tension is equally critical during a wheel swap. Your wheel attaches to the vehicle hub using threaded steel studs and lug nuts, or threaded lug bolts. Tightening those fasteners creates clamping force that holds the wheel rim flat against the brake rotor hat. If you tighten the nuts unevenly, the metal brake rotor warps under heat and causes pedal vibration. If you leave the nuts too loose, the wheel shifts on the studs and shears the metal threads.
How to Change a Tire: The Standard 10-Step Roadside Process
To complete a standard roadside wheel change, secure the car on level ground, loosen the lugs, and lift the frame. Remove the damaged wheel, mount the spare tire, hand-tighten the nuts in a star pattern, and lower the car. Finish by tightening the lugs firmly with a wrench and checking air pressure.
Follow this numbered step-by-step procedure whenever you need to swap a flat tire on a paved roadside shoulder. According to the Michelin Tire Maintenance Guidelines, rushing through preparation steps is the leading cause of roadside mishaps. Take your time and follow each action in exact chronological order.
Step 1: Find a Safe, Level Spot and Secure the Vehicle
Slow down gradually and switch on your hazard warning lights as soon as you notice a flat tire. Look for a straight, level stretch of pavement with a wide shoulder, or pull into a quiet parking lot. Never attempt to change a wheel on a narrow highway curve or a steep hill. Once stopped, shift automatic transmissions into Park, or place manual transmissions into First or Reverse gear. Pull the mechanical handbrake lever firmly or activate your electronic parking brake switch. Ask all passengers to exit the vehicle and stand well back from the roadway.
Step 2: Place Warning Triangles and Chock the Opposite Wheels
Put on your reflective safety vest so approaching drivers can see you clearly in low light. Walk behind your vehicle and place a reflective warning triangle 150 feet (45 meters) down the road. Next, block the wheels that will remain on the ground so the car cannot roll while lifted. If you have a flat front left tire, place wheel chocks tightly in front of and behind the rear right tire. If you have a flat rear tire, chock the diagonally opposite front tire using rubber wedges or heavy bricks.
Step 3: Remove the Wheel Cover and Break the Lug Nuts Loose
Retrieve your jack, wheel brace, and spare tire from the trunk or underbody storage cradle. If your wheel has a plastic hubcap or center cover hiding the lug nuts, pry the cover off carefully. Use the flat metal tip of your lug wrench or a screwdriver to pop the plastic clips free. If your vehicle has alloy wheels with a security lock, fit your locking wheel nut adapter onto the special lug. Place the lug wrench over each lug nut and turn counterclockwise about one half turn. Do not remove the lug nuts completely yet; only break their initial tight resistance while the tire touches the ground.
Step 4: Locate the Reinforced Factory Jacking Point
Open your car owners manual to find the exact reinforced lifting points built into your vehicle frame. Most unibody cars have a reinforced metal pinch weld running along the lower rocker panel behind the front wheels. You will also find a second pair of notched pinch welds just in front of the rear wheels. Look underneath the side sill for two small notches or a stamped triangle arrow marking the reinforced steel seam. Never place a jack underneath plastic body skirts, exhaust pipes, floor pans, or aluminum suspension arms.
Step 5: Lift the Vehicle to Safe Working Height
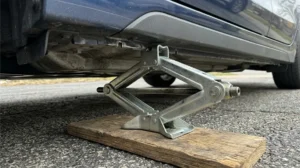
Position your scissor jack or hydraulic jack directly beneath the reinforced metal jacking point on firm pavement. If the asphalt is warm or slightly uneven, slide a flat 1 inch (2.5 cm) wooden board under the jack base. Turn the jack crank handle clockwise smoothly to raise the lifting head until it contacts the metal frame notch. Pause and double-check that the jack sits completely vertical at a 90-degree angle to the ground. Continue cranking until the flat tire sits 4 to 6 inches (10 to 15 cm) above the pavement. Because a deflated tire sits lower than a full tire, you need extra clearance to slide the inflated spare on.
Step 6: Unscrew the Lug Nuts and Remove the Flat Tire
Unscrew the loosened lug nuts the rest of the way using your fingers and remove them from the threaded studs. Place all the lug nuts inside your upturned hubcap or a small cloth bag so they do not roll into traffic. Grasp the flat tire firmly at the nine o’clock and three o’clock positions using both hands. Pull the wheel straight toward your body until it slides clear of the threaded wheel studs. Lay the removed flat wheel flat on its side underneath the vehicle frame just behind the jack. Placing the old wheel under the rocker panel provides an emergency safety cushion if the jack ever slips.
Step 7: Clean the Hub and Mount the Spare Wheel
Wipe away any loose dirt, mud, or flaky rust from the flat metal face of the brake rotor hub. A clean mounting surface ensures the replacement wheel sits completely flat without wobbling at highway speeds. Lift the spare wheel using your leg muscles rather than straining your lower back. Make sure the air valve stem faces outward toward you before sliding the rim onto the hub. Align the holes in the spare wheel rim with the protruding threaded studs and push the wheel flush against the hub.
Step 8: Thread the Lug Nuts by Hand in a Star Pattern
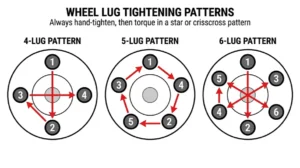
Pick up one lug nut and thread it onto the top wheel stud by turning it clockwise with your fingers. Make sure the tapered cone end of the lug nut faces inward toward the wheel hole. Thread the remaining lug nuts onto the studs by hand to prevent cross-threading the delicate metal grooves. Once all nuts are started, snug them down in a star or crisscross pattern until the wheel cannot rock. Do not apply full wrench force while the vehicle is still balanced in the air on the jack.
Step 9: Lower the Vehicle and Perform Final Torque Tightening
Slide your old flat tire out from underneath the car frame so the path to the ground is clear. Turn the jack handle counterclockwise slowly until the spare tire rests firmly on the ground and supports the car weight. Remove the jack from underneath the frame and set it aside. Fit your lug wrench onto the first lug nut and pull clockwise using firm, steady body weight. Tighten every nut following the exact crisscross star sequence to draw the wheel evenly against the hub. If you have a calibrated torque wrench, tighten each nut to your specific vehicle 2015 f150 lug nut torque or passenger car rating.
Step 10: Verify Spare Tire Pressure and Stow Your Equipment
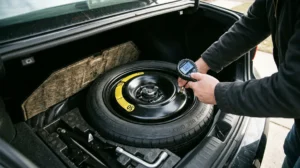
Attach a digital tire pressure gauge to the spare tire valve stem to measure its current air pressure. Full-size spare tires normally require 32 to 36 PSI (2.2 to 2.5 bar), matching the sticker inside your driver door jamb. Compact temporary donut spares require a much higher pressure of 60 PSI (4.1 bar) to support the vehicle weight. If the pressure reads low, connect your portable compressor and inflate the tire to the exact sidewall specification. Pack your flat tire, jack, wrench, and wheel chocks securely inside the trunk before driving to a tire shop.
How Does the Tire Changing Process Vary by Situation Severity?
Changing a wheel varies significantly depending on whether you face a routine driveway swap, a stuck lug nut, or soft ground. Mild driveway maintenance allows for garage jacks and torque wrenches, while severe roadside cases require rust penetrants and base stabilization. Adapting your technique prevents tool failure and personal injury.
Not every tire change happens on dry, level concrete in daylight. Below is a second numbered step-by-step protocol tailored specifically to mild, moderate, and severe mechanical conditions.
1. Mild Severity: Planned Seasonal or Driveway Tire Swap
- Park on your flat garage floor or concrete driveway and engage the parking brake.
- Use a heavy-duty hydraulic floor jack paired with two ratcheting steel jack stands for maximum stability.
- Break the lug nuts loose using an extendable 24 inch (60 cm) breaker bar for effortless turning force.
- Clean the wheel hub flange with a wire brush and apply a thin wipe of anti-seize paste to the center bore.
- Tighten all lug nuts using a click-type torque wrench set to the exact factory specification in your manual.
2. Moderate Severity: Standard Roadside Puncture in Rain or Nighttime
- Pull completely off the wet highway into a well-lit service station, rest stop, or wide paved shoulder.
- Position your smartphone flashlight or magnetic LED work light aimed directly at the wheel well and rocker panel.
- Keep the spare tire inside the dry trunk until the flat tire is unbolted and ready to come off.
- Wipe rainwater and road grit off the lug nut threads with a clean rag before threading them back on.
- Stop at the first service station within 5 miles (8 km) to verify lug tightness and air pressure.
3. Severe Cases: Seized Lug Nuts, Stuck Wheel Hubs, or Soft Ground
- Freeing Seized Lug Nuts: Spray penetrating oil into the lug nut base and wait 10 minutes for the lubricant to soak in. Position the lug wrench handle horizontally at the nine o’clock position and push down firmly with the heel of your boot.
- Releasing a Corroded Wheel Hub: Thread one lug nut back onto the top stud by three full turns so the wheel cannot fall onto your feet. Sit on the ground facing the tire and kick the outer rubber sidewall firmly at the three o’clock and nine o’clock positions. Alternating kicks vibrate the galvanic corrosion loose between the aluminum rim and the steel brake hub.
- Stabilizing a Jack on Soft Dirt or Gravel: Never place a narrow scissor jack base directly onto mud, sand, grass, or loose gravel. Place a 12 by 12 inch (30 by 30 cm) piece of 0.75 inch (19 mm) plywood or a thick flat stone slab beneath the jack foot. This wide base distributes the 1,000 pound (450 kg) corner weight so the jack does not sink or tilt sideways.
How Does Changing a Tire Change Based on Wheel and Vehicle Material?
Wheel materials and fastener styles dictate how you lift the vehicle and tighten the hardware. Aluminum alloy wheels require softer socket contact and higher re-torque checks than stamped steel rims. European vehicles often use threaded lug bolts rather than studs, while heavy pickup trucks require bottle jacks placed under steel axles.
Treating every vehicle identically can lead to scratched rims, bent body panels, or stripped threads. According to the TyreSafe UK Roadside Safety Standards, matching your tools to your wheel material protects both your rims and your wheel bearings. Review the comparison table below before lifting your vehicle.
Vehicle & Wheel Material Specification Comparison
| Vehicle / Wheel Type | Fastener Style | Typical Torque Range | Recommended Jacking Point | Special Handling Requirement |
|---|---|---|---|---|
| Compact & Midsize Cars (Steel Rims) | Tapered Acorn Lug Nuts | 80 to 100 ft-lbs (108 to 135 Nm) | Unibody rocker panel pinch weld | Pry off plastic hubcaps before loosening lugs |
| Sedans & Crossovers (Alloy Wheels) | Mag Seat or Cone Lug Nuts | 85 to 110 ft-lbs (115 to 149 Nm) | Reinforced pinch weld slot | Use thin-wall plastic-sleeved socket to prevent scratches |
| European Cars (VW, BMW, Audi, Mercedes) | Threaded Wheel Lug Bolts | 90 to 105 ft-lbs (120 to 140 Nm) | Rubber jack pad block under sill | Screw an alignment hanger pin into the top bolt hole |
| Heavy Pickup Trucks (Ford F-150, Ram) | Heavy Flange Lug Nuts | 130 to 150 ft-lbs (176 to 203 Nm) | Solid steel frame rail or axle tube | Requires high-lift bottle jack and wheel chocks |
| Electric Vehicles (EVs & Hybrids) | High-Load Lug Nuts | 110 to 130 ft-lbs (149 to 176 Nm) | Designated pucks outside battery pack | Never let the jack touch the underbody battery tray |
Steel Rims vs. Aluminum Alloy Wheels
Stamped steel rims are flexible and durable, making them forgiving during roadside emergencies. Aluminum alloy wheels are cast from softer metal alloys that scratch easily and expand more when heated. When working on alloy wheels, wrap a layer of electrical tape around your metal lug wrench socket. That thin barrier stops the spinning wrench barrel from scraping the painted clear coat inside deep lug holes. Because aluminum compresses slightly under load, you must re-check alloy wheel torque after driving 50 miles (80 km).
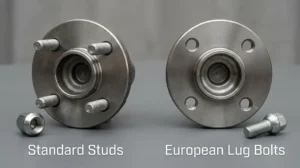
Standard Wheel Studs vs. European Lug Bolts
Most American, Japanese, and Korean vehicles have threaded studs pressed permanently into the wheel hub. When you lift the spare wheel up, you hang the rim directly on those studs. Many European vehicles from Volkswagen, Audi, BMW, and Mercedes-Benz do not have protruding studs. Instead, they have smooth threaded holes in the hub and use removable lug bolts. When you remove the last bolt on a European car, the heavy wheel can drop straight off the hub. Always keep one knee pressed against the bottom of the tire while removing the final bolt. When mounting the spare, thread a plastic or metal alignment pin into the top hole to guide the wheel into place.
Unibody Pinch Welds vs. Truck Frame Rails and EV Battery Packs
Standard passenger cars use unibody construction where the thin sheet metal body and frame are welded together into one piece. Lifting anywhere except the reinforced two-inch pinch weld slot will bend the metal floor upward. Full-size pickup trucks and body-on-frame SUVs sit much higher off the ground and weigh significantly more. Place your bottle jack directly beneath the thick steel frame beam or under the solid rear axle housing tube. For electric vehicles, the high-voltage battery pack spans almost the entire underside of the car floor. Always use rubber jacking pucks inserted into the four factory frame sockets so you never dent the battery casing.
What NOT to Do When Changing a Tire: 7 Costly Mistakes to Avoid
Avoid placing any part of your body underneath a car supported only by a roadside emergency jack. Never loosen or tighten lug nuts fully while the wheel hangs in the air, and never grease lug threads. Skipping wheel chocks or driving fast on a donut spare creates severe safety hazards.
Even experienced drivers make simple errors when rushing on a noisy roadside. According to the RACV Driver Safety Recommendations, avoiding these seven common mistakes ensures your wheel stays securely attached.
1. Never Crawl Underneath a Vehicle Supported Only by a Jack
Emergency scissor jacks and portable bottle jacks are designed strictly for lifting, not for holding weight over time. A gust of wind from a passing semi-truck or a slight shift in pavement can tip a scissor jack over. Keep your head, chest, arms, and legs completely outside the vehicle perimeter at all times. If you need to reach under the car, use your lug wrench handle rather than your hands.
2. Do Not Apply Motor Oil or Grease to Lug Nut Threads
Many people assume lubricating rusty lug studs with grease or motor oil makes future removal easier. Applying lubricant to wheel studs alters the friction coefficient when you tighten the lug nuts. Clean, dry threads convert your wrench effort into safe clamping force without stretching the steel stud. Lubricated threads cause you to over-tighten the nut by up to 40 percent, snapping the metal stud in half.
3. Never Tighten Lug Nuts in a Circle
Tightening lug nuts one after another in a clockwise circle cocks the wheel slightly sideways against the hub. One edge of the rim pinches tightly while the opposite edge leaves a tiny microscopic gap. Once you drive at highway speeds, the wheel wobbles and loosens the remaining nuts. Always cross from one lug directly to its opposite partner in a star pattern.
4. Do Not Jump on the Lug Wrench Handle
Standing with both feet and bouncing on a short factory tire iron is a common cause of twisted ankles and broken tools. Bouncing puts downward shearing stress on the wheel stud rather than rotational turning force. It can also cause the socket to slip off the nut and round off the six metal corners. Instead, use a longer telescopic wheel wrench and push downward smoothly with controlled body weight.
5. Do Not Forget to Check Whether Your Lug Nuts Are Directional
Before threading a lug nut onto a stud, look closely at the two ends of the nut. Almost all lug nuts have one flat end and one angled, conical, or rounded ball-seat end. The angled or rounded end must always face inward toward the wheel rim hole. Installing lug nuts backward prevents the rim from centering on the hub and ruins the wheel holes.
6. Never Ignore Compact Donut Spare Speed and Distance Limits
A temporary space-saver spare tire has a thin 4/32 inch (3.2 mm) tread depth and a narrow contact patch. It also lacks the internal steel belt reinforcement found on regular road tires. Driving faster than 50 mph (80 km/h) or farther than 50 to 70 miles (80 to 113 km) overheats the thin rubber. Additionally, the smaller tire diameter forces your vehicle differential gears and traction control sensors to work overtime.
7. Do Not Use Emergency Canned Tire Sealant If You Plan to Mount the Spare
Pressurized aerosol sealant cans inject sticky liquid latex foam through the tire valve stem. While sealant can plug a tiny pinhole, it coats your internal Tire Pressure Monitoring System (TPMS) sensor in sticky residue. Tire technicians also charge extra cleaning fees to scrape liquid sealant out of the rim before patching. If you have a working spare tire in your trunk, swap the wheel instead of using aerosol foam.
Long-Term Tire Maintenance and Flat Prevention Routine
Preventing roadside flat tires requires a consistent monthly inspection of air pressure, tread depth, and spare wheel readiness. Maintaining proper inflation reduces puncture risks because firm rubber deflects road debris more effectively than soft, underinflated tires. Follow a structured daily, monthly, and seasonal schedule to keep your wheels reliable.
According to Firestone Complete Auto Care, more than 30 percent of drivers discover their spare tire is flat only after getting a puncture. Use this proactive maintenance schedule to eliminate roadside surprises.
Weekly Visual Walk-Around (2 Minutes)
- Walk around your parked car once a week to check that all four tires sit upright without bulging sidewalls.
- Look closely at the tread grooves and remove any wedged stones, glass shards, or metal debris before they work deeper.
- Verify that all four plastic or metal valve stem caps are screwed on tightly to keep moisture and dirt out of the valve core.
Monthly Air Pressure & Tread Depth Check (10 Minutes)
- Measure tire pressure once a month in the morning before driving, while the rubber is cold.
- Compare your readings against the manufacturer placard sticker inside the driver door frame, not the maximum number on the sidewall.
- Check your 5 32 tire tread depth across the inner, middle, and outer grooves using a tread depth gauge.
- Replace any tire once the tread wears down to 2/32 inch (1.6 mm), or at 4/32 inch (3.2 mm) if you drive in heavy rain or snow.
- Open your trunk once every three months and inflate your compact spare tire to 60 PSI (4.1 bar).
Seasonal 6-Month Hardware & Tool Maintenance (20 Minutes)
- Rotate your tires every 5,000 to 7,500 miles (8,000 to 12,000 km) so the front and rear treads wear down at an even rate.
- Having your wheels unbolted twice a year prevents the lug nuts and hub bores from rusting together permanently.
- Inspect the scissor jack screw threads in your trunk and apply a drop of machine oil so the crank turns smoothly.
- Test the batteries in your roadside flashlight and portable air compressor before winter and summer travel seasons.
Before you start
Tick these off as you gather them. Nothing here is specialised.
0 of 10 ready · Ticks are for this visit only and aren't saved.
Do not use this checklist on a steep slope, soft ground, or a narrow shoulder beside moving traffic. Move to a safe level spot or call for professional roadside help.
Common questions
What is the correct sequence for changing a flat tire?
The correct sequence starts with parking on level ground, turning on hazard lights, setting the parking brake, and chocking the opposite wheels. Next, loosen the lug nuts slightly, raise the vehicle at the factory jack point, and swap the flat wheel for the spare. Finally, hand-tighten the nuts, lower the car, and torque the lugs in a star pattern.
Why do you loosen lug nuts before jacking up the car?
You must loosen the lug nuts before lifting the car because the friction of the tire on the pavement stops the wheel from spinning. Furthermore, breaking tight lug nuts loose requires strong downward force on the wrench. Applying that heavy force while the car sits elevated on a narrow jack can rock the vehicle off the jack.
How tight should lug nuts be when changing a tire?
Lug nuts on most passenger cars and SUVs should be tightened between 80 and 100 ft-lbs (108 to 135 Nm), while pickup trucks require 130 to 150 ft-lbs (176 to 203 Nm). During a roadside change without a torque wrench, push down firmly on the wheel brace with your body weight, then have a shop verify the torque promptly.
How long does it take a beginner to change a flat tire?
A first-time driver following a step-by-step checklist normally takes 30 to 45 minutes to change a flat tire safely. That timeframe includes unpacking the spare wheel from the trunk, locating the reinforced frame jacking notch, and stowing the damaged wheel afterward. Experienced drivers with a telescopic wrench and portable inflator typically finish in 15 to 20 minutes.
How far and fast can you drive on a compact spare tire?
You should drive no faster than 50 mph (80 km/h) and travel no farther than 50 to 70 miles (80 to 113 km) on a compact donut spare tire. Space-saver spares have shallow tread, narrow rubber width, and minimal heat resistance. They are designed strictly to carry your vehicle to the nearest tire repair shop.
What should I do if the wheel is stuck to the hub after removing the lug nuts?
If corrosion fuses the wheel rim to the metal brake hub, thread one lug nut loosely back onto the top stud by three turns. Sit on the ground and kick the outer tire sidewall forcefully at the left and right edges. The loose lug nut catches the heavy wheel when the rust bond breaks free.
Where do you place the jack when changing a tire?
Place the jack directly underneath the reinforced metal jacking point nearest to the flat tire, which is located along the side rocker panel on unibody cars. Look for two small cutouts or a triangle marker stamped into the metal pinch weld behind the front wheel or ahead of the rear wheel. On trucks, place the jack under the steel frame rail.
Can you change a flat tire on a sloped driveway or soft ground?
You should never change a tire on a steep incline because gravity can pull the lifted vehicle sideways off the jack. If you are stranded on soft dirt or gravel and cannot roll to pavement, place a thick 12 by 12 inch (30 by 30 cm) wooden board under the jack base and chock three wheels firmly.
Should you tighten lug nuts in the air or on the ground?
You should only snug the lug nuts finger-tight while the wheel hangs in the air so the tapered nut cones center the rim on the hub. Perform all final heavy wrench tightening only after lowering the vehicle so the tire rests firmly on the ground. Tightening on the ground keeps the wheel stationary and prevents jack tip-overs.
Do all new cars come with a spare tire and jack?
No, approximately 30 to 40 percent of new passenger cars and electric vehicles no longer include a factory spare tire or jack. Automakers often replace the spare wheel with a 12-volt portable air compressor and a bottle of liquid tire sealant to reduce vehicle weight. Check your trunk floor well today so you know what equipment you carry.
Was this article useful?