Learning how to remove a stripped screw saves your project. A damaged head causes deep frustration. You can’t twist it normally. The bit just spins inside the metal. This guide gives you the right steps. We cover fixes for wood, metal, and plastic. You’ll find out which tools work best. Screws strip when the bit slips under heavy pressure. This grinds away the cross shape. You have to fix this fast. We’ll explain every extraction method clearly. You’ll handle both mild and severe damage. Let’s get that broken fastener out now.
Before You Start: Tool Checklist
- Wide rubber band: For gripping flat heads safely.
- Locking pliers: Great for grabbing exposed heads.
- Flathead screwdriver: A standard size works best.
- Manual impact driver: Helps break tight rust bonds.
- Rotary tool: Needs a thin metal cutting disc.
- Screw extractor kit: The reliable heavy-duty option.
- Left-handed drill bits: For drilling into solid metal.
- Penetrating oil: Helps loosen stubborn rust fast.
- Thick work gloves: Keeps your hands protected.
- Clear safety glasses: Protects your eyes from splinters.\
Why Do Screws Strip?
Screws strip because the bit slips out under pressure. This slipping grinds away the soft metal edges. Using the wrong size driver ruins it instantly. Bad downward pressure also causes this damage.
You must understand cam out. Cam out happens when your tool loses grip. The bit rotates forcefully against the soft metal. This grinds the sharp edges into a smooth bowl. A smooth bowl offers zero traction. You can’t turn a perfectly round hole. Fixing this takes patience, much like figuring out how to remove coffee stains from white fabric.
Cheap hardware strips much faster than premium parts. Cheap fasteners use very soft metal alloys. High-torque electric drills ruin them easily. Always match your driver bit perfectly. A loose bit guarantees damage. Test the fit before you pull the trigger.
Understanding Fastener Head Types
Different shapes need completely different removal strategies. Identify your hardware type before you start.
Phillips Head Fasteners
Phillips heads strip the most often. Their tapered shape pushes the bit upward under pressure. This actually encourages slipping and metal damage. You must push down hard to keep the bit seated. When they strip, they form a smooth bowl.
Flathead Fasteners
Flathead styles rarely strip in the very center. But the outer edges often chip away entirely. This happens when you use a tiny bit. The small bit twists sideways and breaks the slot. Always pick a flathead bit that fills the gap.
Torx and Square Drive Fasteners
Torx and square drives resist stripping very well. They handle high torque jobs perfectly. The straight sides grab the bit securely. When a Torx fastener strips, you usually need a drill. Rubber bands rarely work on these engineered shapes.
Stripped Allen Bolts
Stripped Allen bolts require a unique fix. Allen wrenches round out the inside hex shape quickly. You can sometimes hammer a larger Torx bit inside. The star shape bites into the rounded corners. This provides enough grip for a clean removal. Taking apart an old bed frame? You might also need to know how to clean a mattress after the repairs.
Method Variations By Severity
You must match your method to the damage level. Minor damage needs simple friction tricks like rubber bands. Moderate damage requires cutting slots or locking pliers. Severe damage demands specialized drill bits and extractors.
Check the damage before you grab a tool. Look closely at the metal head. If you see faint edges, try friction first. If the head looks totally round, skip the simple tricks. Move directly to cutting or drilling. Don’t waste time on tricks that won’t work.
Mild Damage Extraction Methods
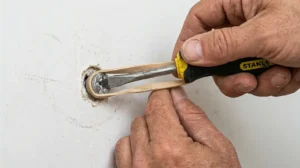
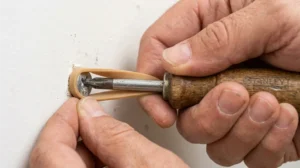
Place a wide rubber band over the screw head. Push your screwdriver firmly into the thick rubber. Turn the driver very slowly counterclockwise. The rubber fills the gaps and provides grip.
This rubber band trick works great for minor damage. You need a flat, wide band for good results. Place it flat against the shiny metal. Push your drill down with heavy pressure. Run the drill on the slowest setting. Fast speeds will tear the rubber instantly.
If rubber fails, try coarse steel wool. Pack a small piece into the head. Push your bit directly into the packed wool. This creates extra friction to grab the slippery metal.
Moderate Damage Extraction Methods
For moderate damage, grab the head with locking pliers. Clamp the heavy pliers down as tightly as possible. Turn the entire fastener counterclockwise to loosen it. This works perfectly if the head sits above the surface.
Pliers need an exposed head to work. You can’t use them if the metal sits flush. Grip the outer edges of the head tightly. Rotate slowly to break the initial friction bond. Once it turns slightly, it comes out easily.
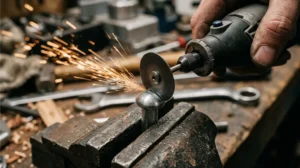
If the head sits flush, cut a slot. Use a rotary tool with a thin cutting disc.
Step-By-Step Slot Cutting Process:
- Put on your clear safety glasses and gloves.
- Install a metal cutting disc onto your rotary tool.
- Set the tool to a medium speed setting.
- Carefully cut a straight line across the damaged head.
- Make the slit about 0.08 inches (2mm) deep.
- Insert a large flathead screwdriver into the slot.
- Push down firmly and turn counterclockwise.
Severe Damage Extraction Methods
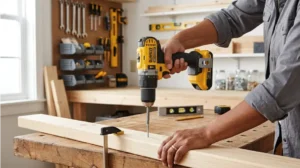
Severe damage requires a dedicated screw extractor kit. You drill a smooth pilot hole first. Then you insert the reverse threaded extractor bit. The extractor bites in and pulls the fastener out.
Extractors provide the most reliable fix for round holes. They come in sizes for different fasteners. You must match the bit size to your hardware. This guarantees maximum gripping power inside the hole.
Step-By-Step Extractor Process:
- Select the correct size extractor for your hardware.
- Insert the burnishing end into your drill.
- Set your electric drill to reverse mode.
- Drill a clean hole exactly 0.12 inches (3mm) deep.
- Flip the bit to the threaded extraction side.
- Keep your drill locked in reverse mode.
- Apply heavy downward pressure while drilling very slowly.
- The threads will catch the metal and back it out.
Surface And Material Specifics
Extraction methods change based on the surface material. Hardwoods require penetrating oil to loosen tight threads. Metal surfaces often need heat to break rust bonds. Drywall requires extreme care to prevent massive wall damage. Different materials grip threads in unique ways. Adjust your approach for the best results.
Removing Fasteners From Wood And Drywall
Wood fibers swell and grip threads tightly over time. Apply a little penetrating oil to the threads. Let the oil soak in for twenty minutes. This lubrication makes turning the fastener much easier.
Drywall crumbles easily under heavy pressure. Don’t use heavy prying tools on drywall. You will create a massive, ugly hole. Always use a gentle extraction method here. The rubber band trick works safely on fragile walls.
Hardwoods present a much tougher challenge. Oak and maple grab metal aggressively. You must use high downward pressure. An impact driver works beautifully for hardwood applications. The striking force breaks the wood grip instantly.
Removing Fasteners From Metal And Plastic
Metal surfaces often involve rust and corrosion. You must apply penetrating fluid to break these bonds. For plastic surfaces, avoid high-speed drilling completely. High friction melts the plastic and ruins your project.
Corrosion welds metal parts together permanently. You can’t overcome deep rust with brute force. Apply penetrating fluid multiple times. Tap the fastener lightly with a hammer. Vibrations help the fluid sink deeper.
You can also use a heat tool on metal. Heat the area slightly with a heat gun. Heating expands the metal just enough. This breaks the rust seal around the hidden threads. Let it cool before trying to turn it. A bad approach can leave ugly marks, similar to trying to figure out how to remove candle wax from fabric with a hot iron.
Plastic requires extreme patience. Fast drills generate intense friction heat. This heat melts the surrounding plastic instantly. Your fastener will spin uselessly in a melted hole. Always use manual hand tools on plastic.
Method Comparison Summary
| Extraction Method | Severity Level | Required Tools | Best Surface Material |
|---|---|---|---|
| Rubber Band Grip | Mild Damage | Wide Rubber Band | Drywall, Softwood, Plastic |
| Locking Pliers | Moderate Damage | Vise Grip Pliers | Exposed Fastener Heads |
| Rotary Tool Slit | Moderate Damage | Dremel, Flathead Bit | Metal, Hardwood |
| Dedicated Extractor | Severe Damage | Extractor Kit, Drill | Thick Wood, Heavy Metal |
| Left-Handed Drill | Severe Damage | Left-Handed Bits | Automotive Metal Parts |
Long Term Prevention Guide
Prevent stripped screws by matching your driver bit correctly. Apply firm downward pressure before you pull the trigger. Use premium fasteners made from hardened steel. Throw away cheap hardware to avoid future headaches.
Prevention eliminates this frustrating problem entirely. Your technique matters more than your tools. Always align your drill perfectly straight. Tilted angles cause the bit to slip immediately. A straight angle ensures maximum power transfer.
Pre-drill your holes in hard materials. A pilot hole reduces the resistance significantly. The fastener glides into the material smoothly. You avoid applying excessive torque this way. Always use a drill bit slightly smaller than your fastener.
Invest in a high-quality bit set. Cheap bits wear down very quickly. A worn bit acts like a dull knife. It ruins the head instead of turning it. Check your bits regularly for visible wear. Replace them when the edges look rounded.
Common Mistakes: What Not To Do
Don’t apply maximum drill speed to a stuck fastener. High speed instantly grinds the metal into a bowl. Don’t use aggressive chemicals that damage nearby finishes. Never force the wrong size screwdriver into a tiny slot. Working too fast is a mistake, just like making a mess while figuring out how to remove oil stains from clothes.
Rushing the Extraction Process
Patience is your absolute best tool here. Frustration leads to very poor decisions. Taking your time prevents secondary damage. Evaluate the damage carefully before picking a removal method. Rushing guarantees you’ll make the problem worse.
Using Excessive Downward Force
Heavy pressure helps keep the bit seated. But excessive body weight can snap the fastener completely. A snapped shaft is much harder to remove. Balance firm pressure with steady, controlled turning speed.
Skipping Lubrication on Rusted Parts
Never try to turn a severely rusted fastener dry. The rust acts like a permanent chemical glue. You will simply snap the head right off. Always use penetrating oil and wait the required time. This simple step saves hours of frustration.
Don’t use generic craft glue to grip the bit. Standard glue lacks the needed sheer strength. It will just snap and create a sticky mess. If you try adhesive, use a dedicated metal epoxy. Metal epoxy provides the extreme strength required.
Don’t ignore safety gear during this process. Drilling metal creates tiny, sharp splinters. These splinters fly upward into your face. Always wear protective glasses during any extraction. A tiny metal splinter causes severe eye damage.
Key Takeaways
- Always match your driver bit size exactly.
- Try gentle methods like rubber bands before drilling.
- Use locking pliers for exposed hardware.
- Apply penetrating oil to loosen rust and dry wood.
- Cut a new slot if the cross shape is gone.
- Keep a screw extractor kit handy for severe damage.
- Wear safety glasses to protect your eyes.
- Use a manual screwdriver to prevent cam out.
- Drill a pilot hole to reduce friction later.
- Never use high speeds when drilling sensitive plastic.
Essential Screw Extraction Toolkit
Before you attempt to force that damaged fastener, gather these specific tools. Having the correct equipment ready will stop you from accidentally making the damage worse and permanently locking the screw in place.
0 of 6 ready · Ticks are for this visit only and aren't saved.
Fragile drywall or soft plastic components when using high-speed drill extractors. The aggressive friction will instantly melt the plastic, and heavy prying will crumble the delicate wall structure. Use manual hand tools for these materials instead.
Common questions
How do you remove a stripped screw with a rubber band?
Place a wide rubber band over the damaged head. Push your manual screwdriver firmly into the rubber. The elastic material fills the gaps inside the metal. Turn the handle very slowly counterclockwise. This provides enough friction to loosen mild damage safely. Push down with heavy, constant pressure.
Does WD 40 help remove a stripped screw?
Yes, standard penetrating fluid works extremely well. It seeps down into gaps between metal parts. This breaks down rust and lubricates dry wood. Spray the fluid and wait fifteen minutes. It reduces friction significantly and prevents more damage.
How do you get a stripped screw out without an extractor?
Use locking pliers if the head sits high. Clamp the pliers tightly around the exposed edges. Rotate the entire tool counterclockwise slowly. Alternatively, cut a horizontal line with a rotary tool. Then use a large flathead screwdriver to turn it.
Can I use super glue to remove a stripped screw?
Yes, but you must use strong metal epoxy. Place a drop of epoxy into the damaged head. Insert a disposable drill bit into the wet epoxy. Let the strong adhesive cure completely overnight. Turn the bit slowly counterclockwise to extract the hardware safely.
How do you remove a stripped screw from metal?
Metal surfaces usually involve deep rust. Apply penetrating fluid to the threads first. If fluid fails, use a heat tool carefully. The heat expands the metal and breaks the rust bond. Use a dedicated screw extractor bit for the final removal.
How does a screw extractor tool work?
An extractor bit features reverse threads on a tapered shaft. You drill a smooth pilot hole first. Insert the extractor and run your drill in reverse. The reverse threads bite deep into the metal hole. It physically locks in and pulls the fastener out.
Will heating a screw make it easier to remove?
Yes, localized heat helps tremendously with rusted metal. Heat causes the surrounding metal to expand slightly. This tiny expansion breaks the chemical rust bonds. Let the area cool completely before attempting extraction. Never use open flames near flammable wood or plastic.
How do you remove a screw with no head?
You must grip the exposed shaft directly. Clamp heavy locking pliers tightly onto the threaded shaft. Rotate the pliers counterclockwise very slowly. If the shaft sits below the surface, drill it out. Use a specialized hollow extraction bit for recessed shafts.
Can a rotary tool remove a stripped screw?
A rotary tool can't pull the fastener directly. It cuts a new slot into the damaged metal head. Attach a thin metal cutting disc to your tool. Cut a straight horizontal line across the center. Insert a standard flathead screwdriver into your new slot.
What is the best tool to remove a stripped screw?
A dedicated screw extractor kit provides the highest success rate. These kits handle the most severe damage easily. They work perfectly when rubber bands and pliers fail. Every toolbox needs a high-quality extractor set. They save hours of frustration during home repairs.
How do you unscrew a rusted stripped screw?
Rust demands chemical or thermal intervention first. Spray the fastener heavily with quality penetrating oil. Tap the head gently to help the fluid sink. Wait twenty minutes for the fluid to work. Finally, use an extractor bit to pull the loosened metal.
How do you fix a screw hole that is stripped?
Once you remove the fastener, the hole might be wide. Pack the empty hole with wooden toothpicks and wood glue. Let the glue dry completely overnight. Cut the toothpicks flush with the smooth surface. You can now drive a new fastener in safely.
Was this article useful?