Learning how to tie a double windsor knot elevates your formal wardrobe instantly. It’s one of those small skills that makes a big difference. This large symmetrical necktie knot projects pure confidence. Our guide teaches you the exact wrapping method for perfect results. For a broader overview of tying techniques, check out our guide on how to tie a tie easy step by step guide.
The Before You Start Checklist
Gather these essential items before you stand in front of your mirror.
- A clean, unwrinkled necktie.
- A dress shirt featuring a wide spread collar.
- Collar stays to keep the shirt points perfectly straight.
- A brightly lit mirror for clear visibility.
- Clean hands to protect delicate silk from natural skin oils.

The Root Cause: Why Windsor Knots Look Sloppy
Sloppy necktie knots happen because of uneven fabric tension and poor collar matching. The double windsor knot requires a wide space to sit properly. Forcing this large knot into a narrow collar creates terrible bunching.
Understanding the geometry of your shirt collar is incredibly important. A wide spread collar opens outward toward your shoulders. This creates a large triangular gap right at your throat. The double windsor knot perfectly fills that specific gap.
If you use a narrow collar, the fabric points will lift awkwardly. That destroys the clean lines of your tailored outfit. You have to match the knot size to the collar opening.
Fabric weight also dictates your overall success. Heavy fabrics create massive knots that look comical. You must balance the tie material with the folding technique. Paying attention to these foundational elements prevents daily frustration. It keeps your neckwear looking crisp and professional.
Step by Step Tying Instructions
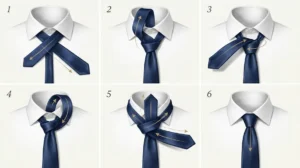
How do you tie a double windsor knot correctly? You wrap the wide blade around the collar loop twice before finishing the front fold. That dual wrapping creates a highly symmetrical triangle.
Follow this exact numbered process for flawless execution. Take your time during the first few attempts.
- Raise your shirt collar and button the very top button tightly.
- Drape the necktie flat around your neck.
- Place the wide end on your dominant side.
- Position the wide end about 14 inches (35 cm) lower than the narrow end.
- Cross the wide end horizontally completely over the narrow end.
- Bring the wide end up through the bottom of the neck loop.
- Pull the wide end smoothly down toward the outside.
- Wrap the wide end tightly behind the narrow end.
- Bring the wide end up over the front of the opposite neck loop.
- Push the wide end down through the inside of that neck loop.
You now have a symmetrical triangle base at your collar.
- Cross the wide end horizontally over the front of this triangle base.
- Pull the wide end back up through the bottom of the main neck loop.
- Slide the wide end carefully down through the new front horizontal band.
- Pull the wide end all the way down to tighten the fabric.
- Hold the narrow tail securely with one hand.
- Push the finished knot upward until it touches your top button.
- Fold your shirt collar down neatly over the necktie band.
Adjusting for Fabric Thickness and Severity
Different materials require completely different handling techniques. You must adjust your tension based on the thickness of your specific neckwear fabric. Failure to adjust will ruin the final shape entirely.
Mild Severity: Lightweight Silk Ties
Lightweight silk is the absolute best material for a double windsor knot. The thin fabric glides smoothly over itself during the complex wrapping process. You can pull the folds quite tightly without creating excessive bulk. Smooth silk creates a sharp triangle every single time. Always use gentle pulling motions to prevent stretching the delicate silk fibers.
Moderate Severity: Cotton and Linen Blends
Cotton and linen blends present a moderate challenge. These materials possess a matte finish with slightly more friction than pure silk. They don’t slide easily. You must manually shape the fabric during every wrapping step. Smooth the horizontal band carefully before pulling the wide end through. This prevents unsightly wrinkles from forming inside the final knot structure.
Severe Severity: Heavy Wool and Tweed
Heavy wool creates a severe challenge for this specific tying method. Wool is incredibly thick and bulky. Wrapping wool twice around the collar loop creates a massive oversized knot. That usually looks disproportionate on most men. If you must use wool, pull the initial collar loops exceptionally tight. This minimizes the internal bulk before you create the final front wrap.
The Art of the Perfect Dimple
How do you make a proper dimple in a double windsor knot? You create a dimple by pinching the wide blade exactly in the center just before the final tightening step. This creates a tailored, elegant fold.
A dimple adds crucial depth and visual interest to your neckwear. It proves that you put thought into your daily appearance. Follow these steps to achieve a flawless dimple.
- Pause your tying process right before the final tightening step.
- Slide your index finger into the center of the wide blade.
- Pinch the outer edges of the fabric forward using your thumb and middle finger.
- Hold this firm pinch just below the knot base.
- Pull the wide end firmly down with your other hand.
- Maintain the pinch until the knot is completely tightened.
- Adjust the edges so the dimple sits precisely in the middle.
Material Specifics: Matching Knots to Collar Styles
The double windsor knot demands a very specific shirt collar style. You can’t wear this knot with every shirt in your closet. Proper matching is essential for a polished look.
Standard point collars feature points that point straight down. These collars leave a very narrow gap at the throat. A large knot will force these points to lift awkwardly off your collarbone. That looks incredibly untidy. Always avoid wearing large knots with narrow point collars.
Wide spread collars point outward toward your shoulders. This design intentionally creates a large triangular space specifically for thick neckwear. Cutaway collars feature an even wider horizontal spread. Both of these shirt styles are perfect for the double windsor knot. They frame the symmetrical triangle beautifully without any fabric distortion.

Knot Comparison Guide
This table helps you quickly understand how this method compares to other popular styles.
| Knot Style | Overall Size | Symmetry Level | Ideal Collar Type | Fabric Consumption |
| Four in Hand | Small | Asymmetrical | Point Collar | Very Low |
| Half Windsor | Medium | Symmetrical | Semi Spread | Moderate |
| Double Windsor | Large | Symmetrical | Wide Spread | Very High |
| Pratt Knot | Medium | Symmetrical | Standard Spread | Moderate |
Common Mistakes to Avoid
Many men make simple errors that completely ruin their tailored appearance. You must avoid these common mistakes to maintain a highly professional look.
The biggest mistake is ignoring the final length rule. The diamond tip of your necktie must lightly touch the center of your belt buckle. The double windsor knot consumes a massive amount of fabric. Therefore you must start with the wide end much lower than usual. If the tie ends up too short you must completely untie it and start over.
Another frequent mistake is wearing a loose, sagging knot. Your knot must sit completely flush against the top button of your shirt. A sagging neckline signals laziness and poor attention to detail. Always push the knot firmly upward while pulling the narrow tail downwards.
Never leave the narrow tail hanging visibly behind the wide blade. Always slide the narrow tail securely into the keeper loop located on the back of the wide blade. If your necktie lacks a keeper loop you should use a discreet tie clip. This hardware holds both fabric pieces securely together.
Long Term Prevention and Care
Improper care destroys expensive neckwear very rapidly. You must follow strict maintenance routines to preserve the shape and color of your formal accessories.
How do you remove a tie without causing permanent damage? You must reverse the exact tying steps gently. Never pull the narrow tail aggressively through a tightened knot. That action tears the delicate internal stitching. It also permanently warps the fabric lining. Always loosen the front loop first with your fingers. Slide the fabric out carefully to maintain structural integrity.
Proper storage prevents permanent wrinkles from forming. Never leave your neckwear tied inside your closet. Always untie it completely immediately after wearing it. Drape silk fabrics smoothly over a dedicated wooden hanger. Gravity will naturally pull out the daily wrinkles overnight.
For heavy wool or knitted materials you must roll them loosely. Store them flat inside a drawer. This prevents heavy fabrics from stretching out over time.
According to global textile care standards you must never place silk in a washing machine. Do not use strong harsh solutions on delicate patterns. Blot liquid spills immediately using a clean dry cloth. Take the item to a professional dry cleaner for safe maintenance.
Common questions
How do you tie a double Windsor knot step by step?
Start with the wide end on your dominant side. Cross it over the narrow end. Loop it up through the neck hole. Wrap it behind the narrow end. Loop it over the opposite side. Cross the front horizontally. Pull it up through the neck hole and down through the front loop.
What is the difference between a Half Windsor and a Double Windsor?
The double version requires two complete wraps around the collar loop before the final front fold. This creates a very large, symmetrical triangle. The half version only wraps around side of the collar loop. This creates a smaller, medium sized triangle using significantly less fabric length.
When should you wear a double Windsor knot?
You should wear this style for highly formal business events and weddings. It projects authority, confidence, and professionalism. It is the perfect choice for boardroom presentations and executive meetings. Always pair it with a wide spread collar shirt and a sharply tailored suit jacket.
Does a double Windsor use more tie length?
Yes, this specific method uses significantly more fabric than almost any other style. The dual wrapping process consumes extra length very quickly. Taller men often struggle with this method because the final result ends up too short. Taller men should always purchase extra long neckties for this style.
What shirt collar type is best for a Windsor knot?
A wide spread collar or a cutaway collar is the absolute best choice. These collars feature a wide opening at the throat. This wide opening accommodates the massive thickness of the fabric perfectly. Narrow collars will bunch up and lift awkwardly if paired with this large style.
Can you tie a double Windsor with a skinny tie?
You can technically tie it, but you should avoid doing so. Skinny ties are designed for modern, slim aesthetics. Using a bulky wrapping method on a skinny tie creates a disproportionate, awkward bulge at the neck. Always use a simple Four in Hand method for skinny widths.
Is the Full Windsor and Double Windsor the same exact thing?
Yes, these two terms refer to the exact same tying method. The correct historical name is the Full Windsor. Many people simply call it the double version because you wrap the fabric twice around the collar loop. Both terms describe the exact same large, symmetrical triangle shape.
Why does my Windsor knot always look crooked?
Your knot looks crooked because you are applying uneven tension during the wrapping steps. You must pull the fabric with equal force when creating the right and left collar loops. If one side is wrapped tighter than the other, the final triangle will tilt awkwardly to one side.
How do you make a proper dimple in a Double Windsor?
You create a dimple immediately before the final tightening phase. Squeeze the center of the wide blade gently with your index finger. Pinch the outer edges forward using your thumb. Hold this exact pinch while you pull the fabric firmly down to lock the elegant crease into place.
How long should a tie hang after tying a Windsor knot?
The absolute tip of the wide blade must gently touch the exact center of your belt buckle. It should never hang below your belt line. It should never rest high up on your stomach. Adjust your starting lengths carefully to achieve this perfect proportion every single time.
Was this article useful?